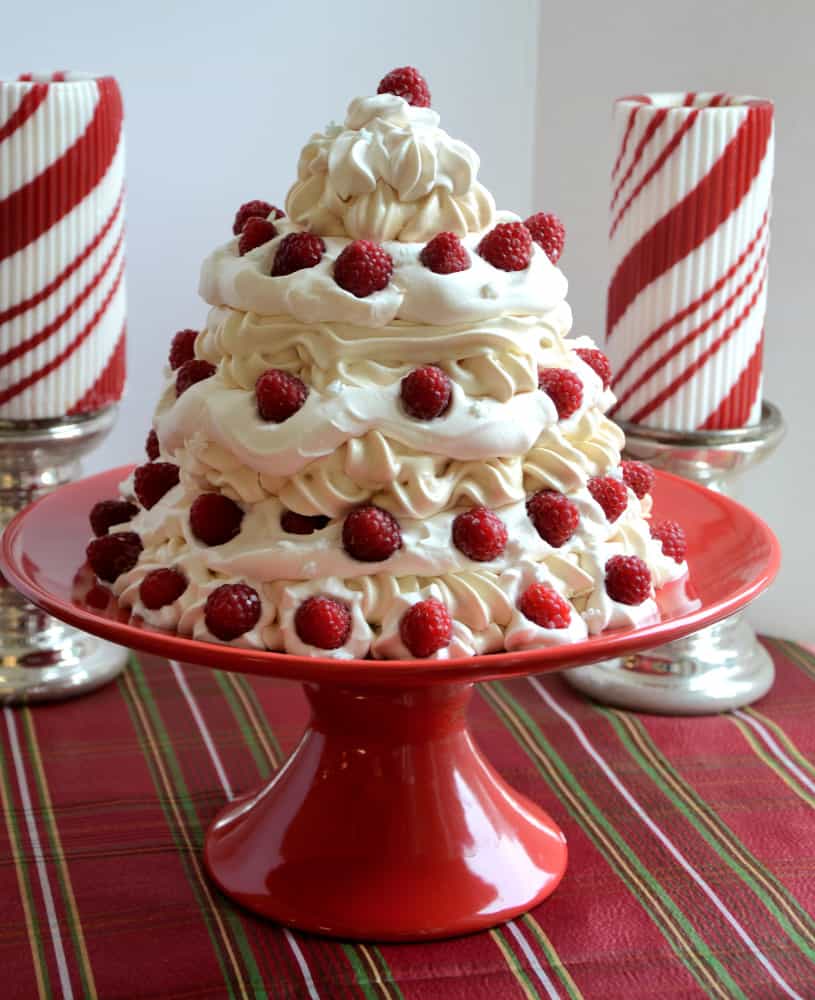
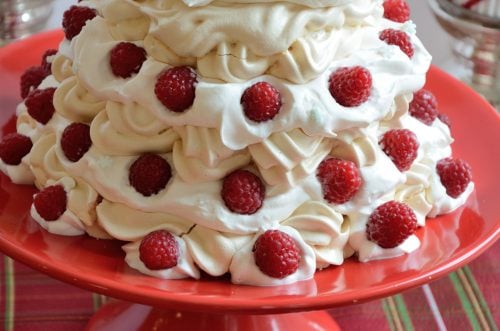
This spectacular Meringue Christmas Tree is actually way easier to make than it looks! And it only uses a few simple ingredients!
You will need a pastry bag and tip, some parchment paper and a bit of time because the meringue layers bake low and slow. Also the cream of tartar is essential to help the meringue and the whipped cream hold their shape. It is readily available in the baking section of your supermarket.
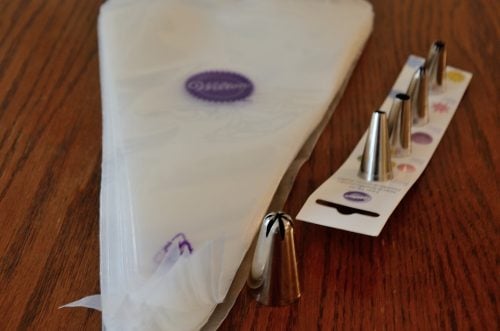
I have this little Wilton decorating set - disposable pastry bags (YEAH!) and various size tips. I used a Wilton 2 D tip. Just use the biggest tip you can.
I made the meringues the day before I was serving this. Then I assembled it the morning I was going to serve it.
The key to storing meringues is that they need to be stored in an air tight container. Cook's Illustrated experimented with storing them in air tight containers on the counter, in the fridge and in the freezer (all different humidity levels) for 2 weeks. As long as the container is air tight it didn't make any difference to the crispness.
It is a bit tricky to store once it is assembled though so I am thankful for my cold Canadian garage and lots of parchment paper. It doesn't require any rest time so you may want to assemble it as close to serving time as is feasible for you.
You will need to cut out 4 parchment paper circles. Use the platter you intend to serve on as a guide for your biggest circle. I pulled out a couple of round cake pans and bowls and inverted them on the platter to get an idea for the diminishing dimensions. Make sure your largest circle leaves at least an inch from the edge of your platter. My circles were about 8 ¼", 7", 6" and 4 ¼ ".
Use your inverted cake pans and bowls to trace your circles out on the parchment paper. Get that out of the way first and the rest will be a breeze.
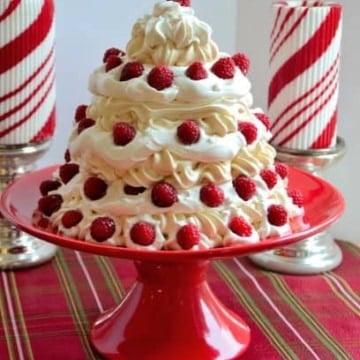
When you are assembling the layers you will want to have a slight edge of the meringue layer bare, then about a 1" of the whipped layer exposed before the next meringue layer goes on. Your raspberries and decoration will need the exposed whipped cream to rest on.
You can get really creative with this! It is still spectacular in its simplest form but you can add liqueur to the whipped cream to add a bit of flavour. You can decorate with sprinkles to imitate a decorated Christmas tree. You can add truffles for accents. You can get creative with the 'tree topper' with other edible Christmas decorating shapes.
Because the meringue and the whipped cream filling are basically neutral flavours you can add flavour hits with your decorating accents - berries, chocolate chips, white chocolate chips, coconut. (I could go on!)
I am actually thinking Creme de Menthe in the meringue might make a nice minty, green layer and the white whipped cream might look like snow on the branches. I'll let you know how that works out if I decide to try it!
However - back to the basic version... when you are ready to serve it I found it was easiest to remove the top layer to a separate platter. Transfer it to a serving plate and spoon the berry coulis over it. Remove the next layer to the platter and use a knife to cut it into serving size portions.
You can store leftovers in an airtight container in the fridge or freezer. If frozen allow it to thaw about 20 minutes before serving. Frozen actually makes an awesome dessert too... Check out this Frozen Walnut Torte made with frozen meringue layers as well.
Meringue Christmas Tree
If you tried this, or any other recipe on my website, please leave a 🌟 star rating and let me know it went in the 📝 comments below!
Save Print Pin FacebookIngredients
Meringue
- 8 egg whites
- 2 cups super fine sugar (you can put regular sugar in your food processor to make it finer)
- ¾ teaspoon cream of tartar
- 1 teaspoon vanilla (optional - it will darken your meringue)
Filling
- 3 cups whipping cream
- 1 teaspoon cream of tartar
- 2 Tbsps icing sugar
- 1 teaspoon vanilla extract (Or substitute liqueur of your choice)
- 2 6oz pkgs fresh raspberries rinsed and picked over
- other cake decoration sprinkles as desired (optional)
Raspberry Coulis
- ½ cup sugar
- 3 Tbsps water
- 16 oz fresh raspberries (or 12 oz frozen raspberries)
- 1 teaspoon fruit liqueur such as Chambord, Kirsch or Framboise wine (optional)
Instructions
Meringue
- Preheat your oven to 300 degrees F. Separate your racks to hold 2 sheet pans.
- Cut 4 parchment circles approximately 8 ¼". 7" 6 " and 4 ¼ '. (Or proportionately to fit your serving platter). Position your parchment paper circles on the 2 baking sheets.
- Beat the cold egg whites and cream of tartar until soft peaks form. Beat the sugar in slowly - sprinkle a Tablespoon in at a time. Add vanilla if using and continue beating until it is glossy with firm peaks.
- Using a pastry bag and a large pastry tip (I used Wilton 2D tip) pipe the meringue on to your largest parchment circle to form a tree shape. Make the tips reach the outer rim of your parchment circle and indent as you go around to mimic an evergreen tree. Continue piping to fill in the inner circle with meringue. Repeat for the next two layers. For the final, smallest layer pipe florettes in a circle to form the peak of the tree.
- Reduce the oven heat to 250 degrees F. Place the baking sheets on the racks. Bake 2 hours,switching the trays on the racks after 1 hour.
- Meringues should be dry to the touch when done. After 2 hours, allow meringues to cool in the oven with the door open for another hour.
Filling
- Beat whipping cream and cream of tartar until soft peaks form. Add the sugar 1 tablespoon at a time and vanilla or liqueur. Continue to beat until stiff peaks form.
- When meringues are cool you can start to assemble the tree. (See notes) Start with largest meringue for your base. Pipe the whipped cream about a ½ " inside the edge of the meringue base, following the evergreen tree shape. You will want to have a thin bit of outer edge of the meringue bare, then about 1" of whipped cream showing, then the next meringue layer. You will be using the whipped cream showing to hold your decorations.
- Reserve one pkg of raspberries to decorate the final assembled cake. You will use the other container to sprinkle a few berries around the inside area each layer of whipped cream. (See Note 2)
- Repeat by adding the next meringue layer, whipped cream layer and berries. When you get to the tree top, just pipe a few cream florettes to hold the tree top raspberry.
- Once the meringue and whipped cream layers are assembled,decorate the tips of the 'tree' with a fresh raspberry. You can also sprinkle little star or snowflake decorations so they catch on the whipped cream. (See Note 3). You can also pipe florettes around the base of the tree to hold more raspberries.
Raspberry Coulis
- Heat the sugar and water over medium heat til the sugar is dissolved. Put syrup and berries in the blender and puree. Strain mixture through a a fine mesh sieve. Add the liqueur if using.
Serving
- To serve, you will want to present the full tree at the table. Take another large plate with you. Remove the top layer. Transfer serving size portion to a dessert plate and serve with a dollop of Raspberry Coulis sauce.

Leave a Reply