• Skip to primary navigation
  • Skip to main content
  • Skip to primary sidebar
The Wine Lover's Kitchen
  • About
  • Summer
  • Recipes
  • Wine
  • Subscribe
    • Facebook
    • Pinterest
    • Twitter
menu icon
go to homepage
  • About
  • Summer
  • Recipes
  • Wine
  • Subscribe
    • Facebook
    • Pinterest
    • Twitter
  • subscribe
    search icon
    Homepage link
    • About
    • Summer
    • Recipes
    • Wine
    • Subscribe
    • Facebook
    • Pinterest
    • Twitter
  • ×
    Home » Desserts

    Food Processor Pie Crust

    Published: Jul 7, 2017 · Modified: Dec 15, 2022 by Carolyn Hetke · This post may contain affiliate links,

    Jump to Recipe Print Recipe

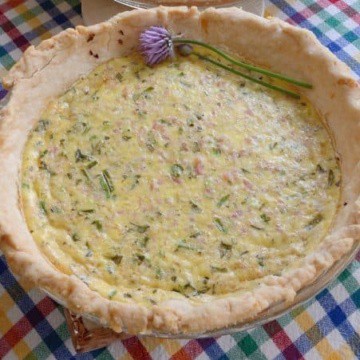
    I was in a hurry to make some quiches one day and decided to make this Food Processor Pie Crust. It was easy peasy and tasted great!

    Much as I love my Easy Pie Crust... this one might just be even easier.

    And...the secret to flaky pie crust is to not over process the dough. There is no danger of over-handling the dough here or warming the shortening with your hands.

    Rolling it out and transferring it to the pie plate is easy with the help of 2 sheets of plastic wrap.  That way I didn't even have to clean the excess flour and crumbs off my counter!  Rolling out between 2 sheets of plastic wrap makes it really easy to get a paper thin pie crust without a lot of handling.  It is  really quick to peel off one layer of the plastic wrap and then invert the crust into your pie plate.

    It only takes a few minutes to mix in the food processor but you do need to plan a bit ahead since it needs to rest at least 60 minutes in the fridge before rolling out. The dough needs to rest for at least one hour in the fridge but it can be held up to 24 hours.  So you have flexibility in when you make this.  You can get the dough making out of the way and then just roll it out when you're ready.

    This makes 2 - 9" (23 cm) crusts - so either one double crusted pie or two shells.

    If you want to make the entire quiche see my recipe for Spring Herb Quiche.  For the quiche I cooked it at 350 F (Gas Mark 4)  for the entire 45 minutes.

    Next time I need to bake a blind pie crust I am going to use this recipe and bake at 350 F (Gas mark 4)  so it doesn't get overly dark.

    This recipe is good for savoury dishes since there is no sugar or butter to add richness. It is a perfect foil for a savoury quiche!
    food-processor-pie-crust

    Food Processor Pie Crust

    Pie Crust in no time!
    Author: Carolyn Hetke

    If you tried this, or any other recipe on my website, please leave a 🌟 star rating and let me know it went in the 📝 comments below!

    5 from 1 vote
    Prevent your screen from going dark
    SaveSaved!
    Print Pin Facebook
    Course: Dessert
    Cuisine: American
    Prep Time: 10 minutes mins
    Cook Time: 45 minutes mins
    Total Time: 1 hour hr 55 minutes mins
    Servings: 2 9" (23 cm) crusts

    Ingredients

    • 2 ½ cups (300 grams) flour
    • 1 teaspoon salt
    • ¾ cup (155 grams) shortening or lard
    • 6-8 Tbsps (90-120 ml) ice cold water

    Instructions

    • Add flour and salt to food processor and swirl to mix.
    • Add shortening in chunks and pulse until shortening is pea-size. Do not over-pulse.
    • Add water 1 tablespoon (15 ml) at a time and pulse until dough forms a ball and comes away from the sides.
    • Remove dough and divide in half. I weigh mine on a kitchen scale to make sure I have 2 equal crusts. Shape into uniform discs.
    • Wrap in plastic wrap and refrigerate at least 60 minutes or up to 24 hours.
    • Remove from refrigerator. Place dough between 2 sheets or plastic wrap at least 10" (25 cm) square. Roll out to desired size. Peel off one layer of the plastic wrap and supporting the center with your hand, invert the crust onto your pie plate. Shape sides.
    • Bake according to your filling instructions.
    • To blind bake prick the bottom of the crust a few times with a fork and cover the crust with foil. Weight the foil down with pie weights or dried beans. Bake at 350 degrees (Gas Mark 4) about 45 minutes. Remove weights and foil and allow to cool.
    Tried this recipe?Mention @thewineloverski or tag #thewineloverski!

    Reader Interactions

    5 from 1 vote (1 rating without comment)

    Leave a Reply Cancel reply

    Your email address will not be published. Required fields are marked *

    Recipe Rating


    Primary Sidebar

    Hi! I am Carolyn - the Wine Lover in the Wine Lover's Kitchen! I absolutely love having friends and family around my table with great food and wine to enjoy. If you want great recipes and wine recommendations you have come to the right place!

    Learn more about me →

    Summer Recipes

    • Potato salad in a bowl.
      Potato Salad With Celery and Cucumber
    • Beet, heirloom tomato and burrata wedges on a plate.
      Viking Cruise Recipe: Beet and Burrata Salad
    • A bowl of cold, creamy, almond soup with toasted almond and green grape garnish.
      Chilled Spanish Garlic Soup (Sopa de Ajo)
    • A bowl of cold cherry soup.
      Cherry Soup with Cinnamon Croutons

    Popular Recipes

    • Close up of creamy Cafe de Paris sauce.
      Café de Paris Sauce - The Original 'Secret Sauce'
    • Puffy, crispy flour tortilla flavoured with olive oil and chili, lime seasoning.
      Air Fryer Tortillas
    • Golden brown spinach feta scones on a plate.
      Savoury Spinach and Feta Scones
    • Piece of Italian crumb cake with pistachio cream filling, topped with crushed pistachios and icing sugar.
      Pistachio Cream Crumb Cake
    • Medium rare beef tenderloin sliced on a platter.
      Air Fryer Beef Tenderloin
    • Baked sweetened condensed milk buns piled in a basket.
      Bread Machine Sweetened Condensed Milk Dinner Rolls

    Footer

    ↑ Back to top

    Home

    Recipes Wine

    About

    • Privacy Policy & Disclaimer
    • Accessibility Policy
    • About

    Newsletter

    Tired of wandering around looking at wine labels? Get recipes and my Best Buy wine picks every two weeks!

    • Sign Up!

    Contact

    • Contact

    Follow me on:

    • Facebook
    • Pinterest
    • X -Former Twitter

    Copyright © 2025 The Wine Lover's Kitchen

    Rate This Recipe

    Your vote:


    A rating is required
    A name is required
    An email is required

    Recipe Ratings without Comment

    Something went wrong. Please try again.