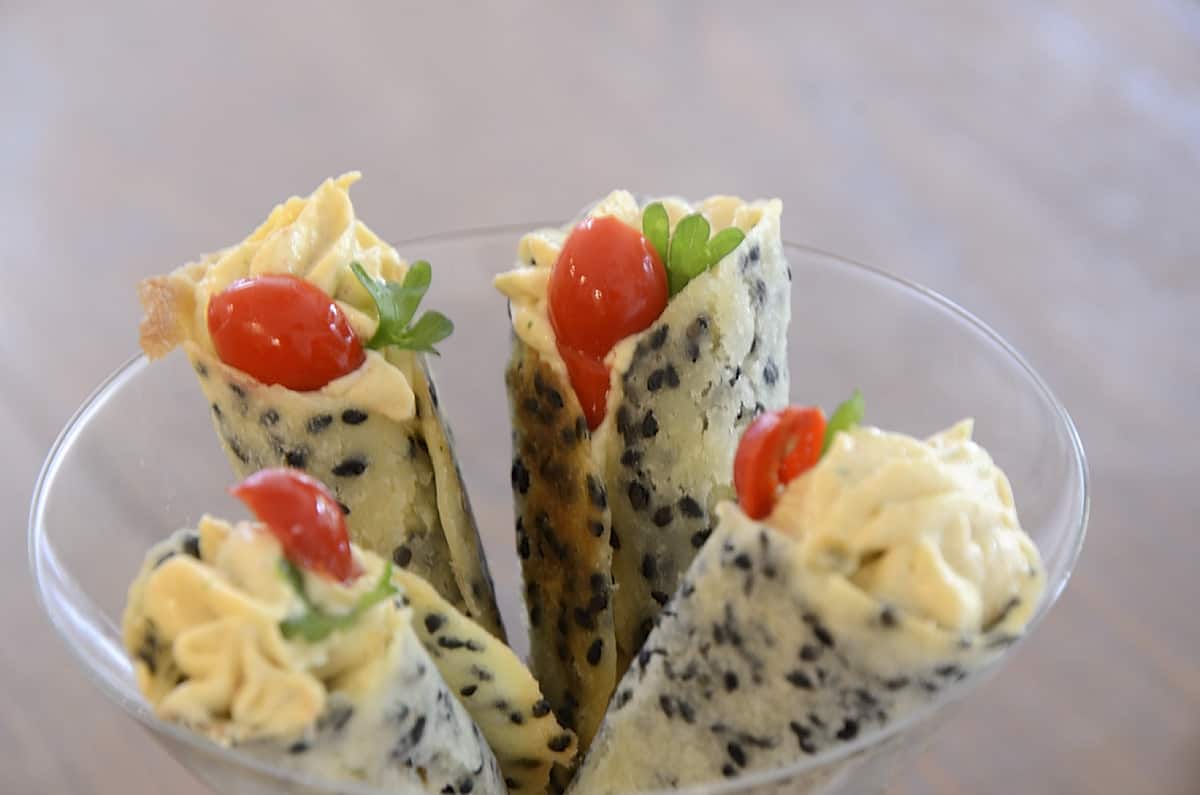
An Appetizer Cone is one of the cutest ways to serve a handheld bite or two! And you can make them at home.
The batter is a cinch. Full disclosure- shaping the cones is a bit finicky (but worth it for a spectacular presentation). The batter can also be used to make regular cracker-like bases for appetizer toppings.

Recipe credit goes to Thomas Kellar of The French Laundry fame.
I filled mine with this Shrimp Mousse. You could use any mousse or cream cheese mixture you like.
What Makes This Recipe Special?
- This simple batter makes for a rather show-stopping presentation.
- The recipe is super simple. All your effort goes into shaping the cones.
- I have linked a Salmon Mousse filling .Your favourite cream cheese mixture or mousse will work too.
Jump to:
Ingredients
- The batter uses standard ingredients. Black sesame seeds are called for to add texture and interest. The more common white sesame seeds will also work. Black mustard seeds (not yellow) would also be an interesting substitution.
How To Make It
- Make the batter and prepare 2 baking sheets with uniform circles marked on the parchment. (Macron stencils would work here if you have them.)
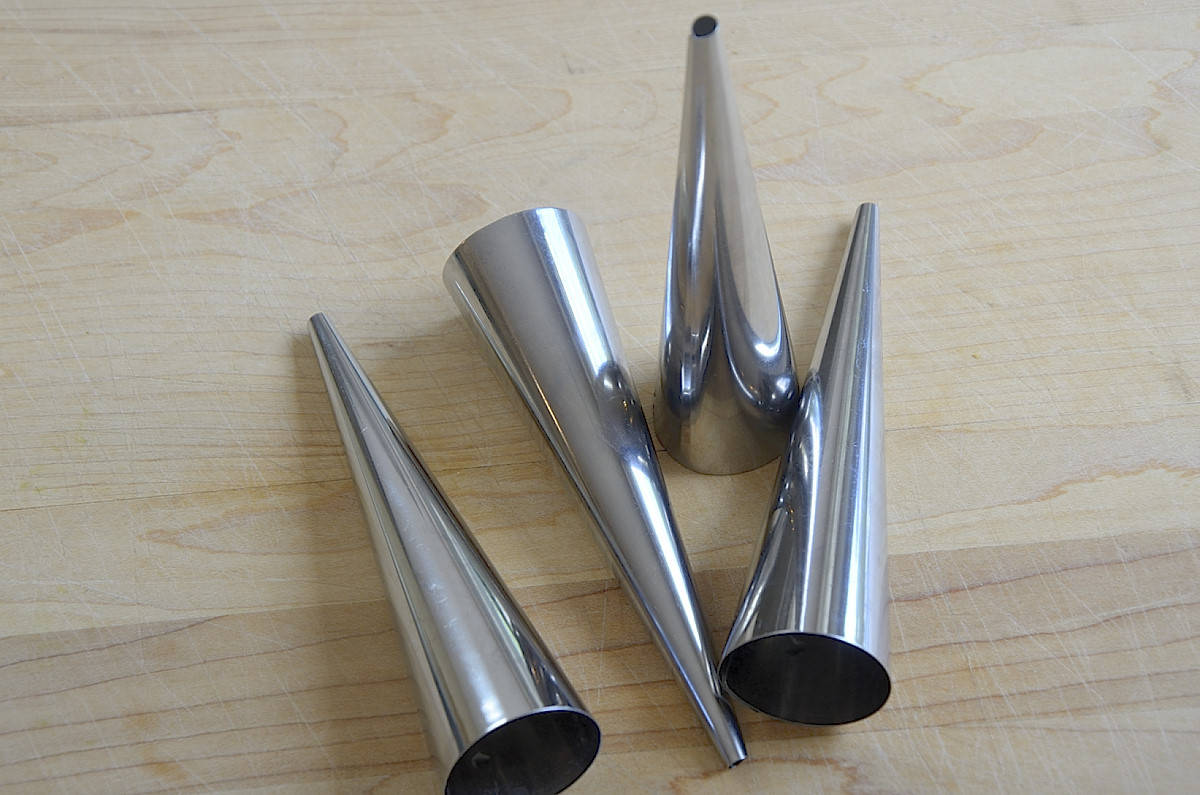
- For the cones, it is important to measure the batter uniformly. Spread the batter to a uniform consistency. It should be thin but with no holes or gaps. Too thick, and your disc will crack instead of rolling around your mold (commonly called Cream Horn molds).
- Use small molds about 4" long. You will need 8 if you work in batches of 4 discs at a time.
- You will bake 4 discs at a time. The 2nd baking sheet will start baking while the first 4 discs are cooling on the molds.
- Refrigerate the batter while the discs are baking so it doesn't get too warm. Too warm, and you will have really buttery edges, and the disc is hard to work with.
- You may want to treat your first 4 discs as practice to get the thickness and rolling technique worked out. I practiced on the first 4 discs. The rest went well until the last batch, when I wanted to just use up the last of my batter. I made the discs too thick, and they cracked instead of rolling. So don't be tempted to make them bigger/thicker just to use up that last bit of batter.
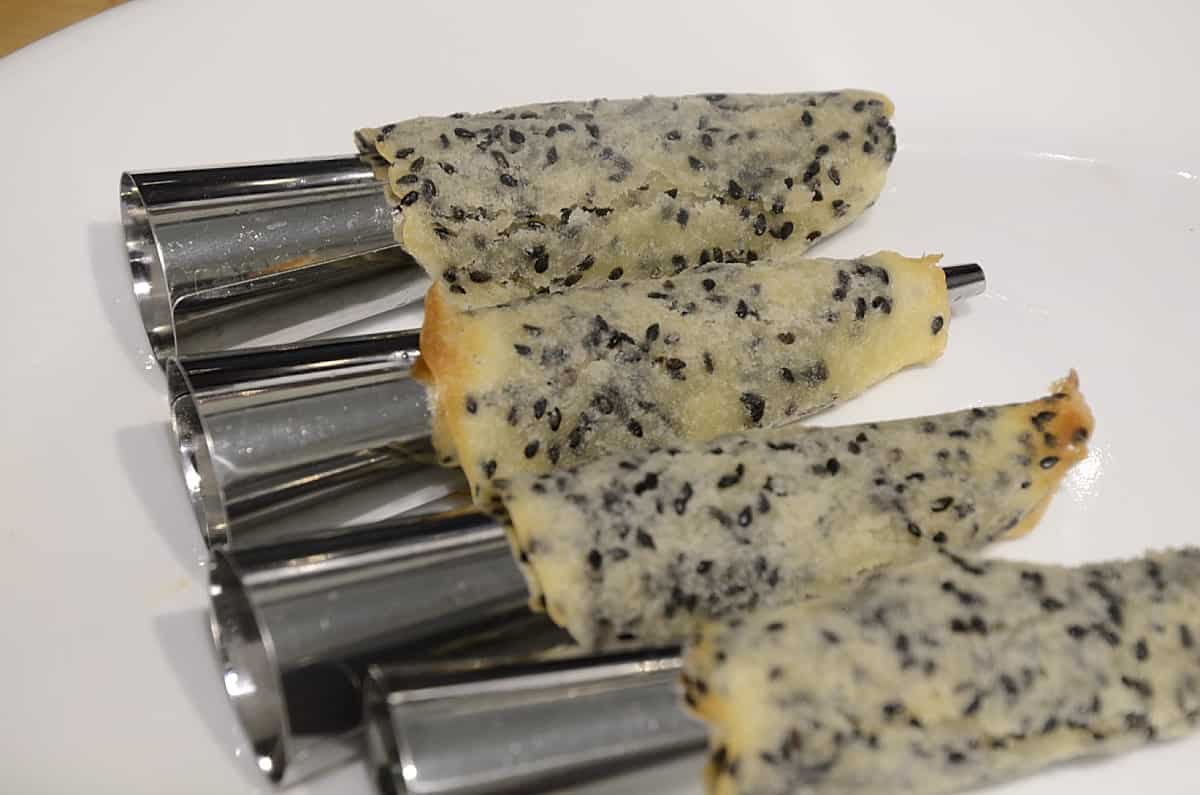
- At the mid-baking point, you are going to use a flat knife to help you shape the disc around the metal cone. Then you will finish the baking process and let the cones cool a bit on the mold.
- The edges tend to be thinner and crispier because of the amount of butter in the recipe, so you may want to use a cookie cutter or small glass to cut out the center of the disc for your base to have a uniform edge.
- As a Plan B... if your disc cracks instead of rolling, you can finish baking it flat and use it as a cracker-like base.
- If you prefer to just bake them as cracker-like bases, then you can bake as many as fit on your pan at one time.
The good news- the batter is quick to make, and the discs cook in 8-10 minutes so working in batches isn't too onerous.
I filled mine with this Shrimp Mousse that I piped in. If I haven't scared you off yet - Congratulations! Good luck!
How To Serve
There is an obvious conundrum here. How do you plate or present these? As you can see from the photos, I leaned them against the outer sides of martini glasses, and it worked fine. There are some purpose-built stands available, but I hesitate to stock up on single-purpose kitchen accessories. You might find cardboard pieces with holes cut out at some specialty kitchen shops.
Related Recipes


Sesame Charcuterie Cones
If you tried this, or any other recipe on my website, please leave a 🌟 star rating and let me know it went in the 📝 comments below!
Save Print Pin FacebookEquipment
- 8 cream horn molds if making cones instead or cracker bases'
- Parchment paper for 2 baking sheets
- offset spatula recommended (Or back of a large metal spoon)
- 2 baking sheets
Ingredients
- 7 Tbsps flour 65 grams
- 4 tsps sugar
- ⅔ teaspoon sea salt
- 8 Tbsps unsalted butter 114 grams room temperature
- 2 large egg whites cold
- 2 Tbsps sesame seeds preferably black
Instructions
- Trace 4-6 4" circles on the back of the sheets of parchment that fit your baking sheets. (Or as many as will fit if you making cracker bases instead of cones). Line baking sheet with the parchment, ink side down. You will alternate baking sheets to allow the other baking sheet to cool before making the next batch.
- Fill a large glass with water so you can dip your offset spatula or spoon in the water if batter starts to stick.
- Preheat oven to 400℉.
- Mix flour, sugar and salt in a bowl.
- Beat the butter in a separate bowl until it is lighty and creamy, the texture of mayonnaise.
- Beat the egg whites in to the flour mixture.
- Beat the butter in to the mixture by thirds, scraping down the sides as necessary. Mixture should be smooth and lump free.
- (See Note 1 if making discs instead of cones.)For cones:Drop 1 Tablespoon of batter in the middle of your traced circes. Measure carefully so your discs are uniform. It is recommended to make 4 discs at a time. (Refrigerate the batter remaining in the bowl until you are ready to make the next batch.) Spread the batter evenly to the outer edges of the circle using an offset spatula or the back of a large metal spoon. If the batter sticks to the metal- dip it in the water and then continue spreading. The batter should be thin but with no holes in it. Too thick and the disc will crack instead of roll. Sprinkle each dough circle with sesame seeds just before baking.
- Have a broad thin knife on hand that you can use to help guide the baked disc around the mold.
- Bake 4-6 minutes. The outer edge should be starting to brown but the center won't be. Remove the baking sheet from the oven. Flip the disc so sesame seed side is down. Place the horn mold so the pointed end is at 7 o'clock on the the disc. Use the edge of the knife to help lift the side of the disc and wrap it around the cone. Start with the far side of the disc and get it up around the cone. Then roll the dough and cone from the side closest to you to make the tightest cone you can. Discs are hot - use your fingers to roll and wrap the disc as tightly as possible. Leave the cone on the baking sheet seam side down if possible. As you wrap cones 2,3 and 4 arrange them leaning against each other to try to keep the seam side down and prevent them from rolling around on the baking sheet.(If you have discs that won't wrap just leave them on the pan and return to the oven with cones. You will have a crispy cracker like base instead when done.)
- Return the cones to the oven and bake another 3-4 minutes. Cones should be turning a golden brown. If they are not fairly evenly browned you may want to stand the cones on end and return to oven for another minute or so. Allow cones to cool half a minute or so before gently removing and placing on a platter lined with paper towel to abosorb any excess butter.
- For your second batch - you can't spread the batter on a hot sheet pan. Use a paper towel to wipe any excess butter off the hot sheet pan. Set it aside to cool. Use the second sheet pan to make 4 more dough discs as per the instructions above. Repeat, alternating pans until you have used all the batter.
- Cones will keep stored airtight for up to 2 days. They will be okay for another couple of days but they start to lose flavour and texture after 2 days.

Leave a Reply