Making Sourdough Bread is a labour of love and if you like dense, flavourful bread it will be worth it.
I found the process rather confusing the first time through, partly because I had read so many posts and watched so many videos that I had about 3 slightly varied versions going on in my head at once.
But after researching, most of my questions had been answered. Then came the actual doing...
I am not going to mislead you... the first time I made my starter and then the bread my kitchen looked like a crime scene. There were sticky, gluey bits of dough on my utensils, my counter, in my sink. Starter is basically flour and water.... and what else does flour and water make? Glue!
But - I was determined to get it right because in the days of Covid 19 isolation there had been no commercial yeast available for several weeks.
So- if I haven't scared you off already... stick with it! It gets easier and I will give you a few tips that I was happy to stumble upon along my way. My first two loaves were definitely edible but the bottom crust was so crusty that I could hardly cut it with a bread knife. I learned through trial and error to bake at a lower temperature and to put an overturned baking sheet under the Dutch oven. Read through my tips below to see the things I had to adjust before I got to my ideal loaf.
There are 10 steps to making sourdough bread and the process generally takes about 24 hours from start to finish - so plan ahead.
There are points where you can refrigerate your dough or where the timing is flexible that you can use to fit the process in to your schedule.
Step by Step Overview
- Feeding Your Starter - this assumes you have a mature starter (also known as Levain) that you have been storing in your fridge. (Check out How to Make Sourdough Starter here if you need to start one.) You are going to take out half of it. Feed the one going back in the fridge, (which should be about ¼ cup's worth of starter) 2 ½ Tbsps water and 3 Tbsps of flour. Stir well and return in airtight container to the fridge. The other half that you are going to use- feed it 3 Tbsps flour and 2 ½ Tbsps of water, stir well and leave in a warm area (like you would for a bread dough rise) for at least 4 hours to activate. This timing will vary depending on temperature and strength of your starter and may go up to 7 hours. A great way to do this is to take your starter out the day before and feed it two times about 12 hours apart. Then you know you will be ready to go first thing.
- Test Your Starter- do NOT skip this step. Drop a teaspoon of starter in a glass of water. It should float. If it floats it is ready. If it doesn't float it needs more time. You are going to put a lot of effort and flour into your bread so don't risk a sourdough fail because your starter was not ready.
- Autolyse- you are going to mix the flour and water from your recipe and make a very shaggy dough. It is going to rest about 1 hour to allow the gluten to develop. If you are feeding your starter the same day you plan to bake you can start the autolyse an hour before you expect your starter to be ready.
- Combine the Starter and Salt into the dough from Step 3. You are also going to add a small amount of warm water. You are going to mix this very wet sticky dough with your hands. Wet your hands as you mix it through your fingers and let it stretch from its own weight.
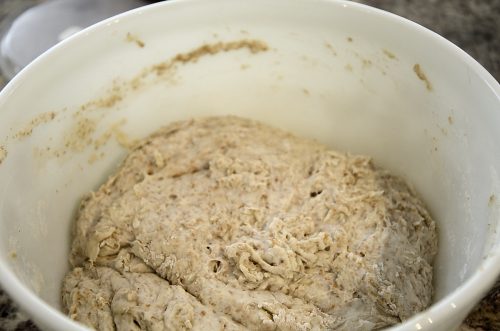
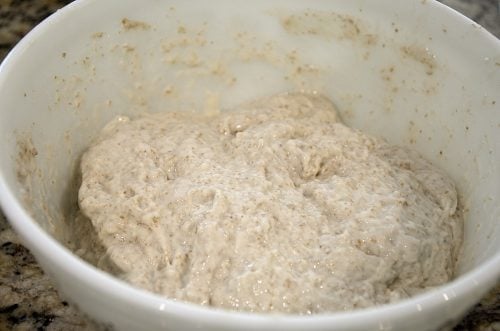
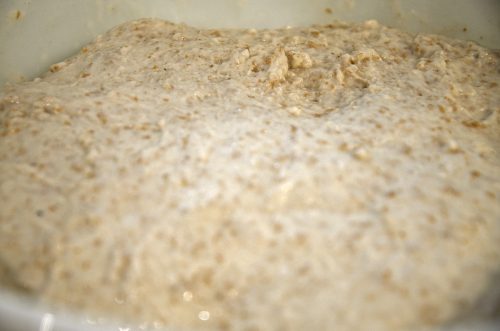
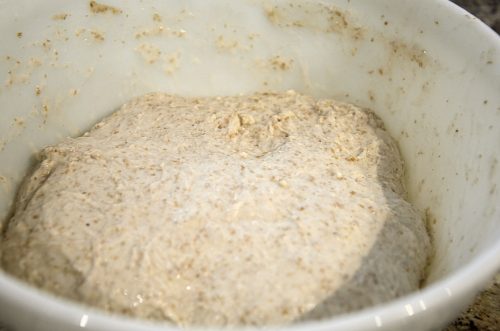
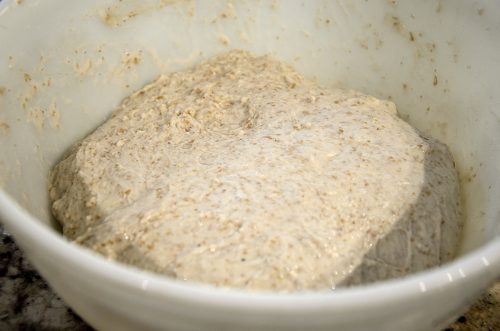
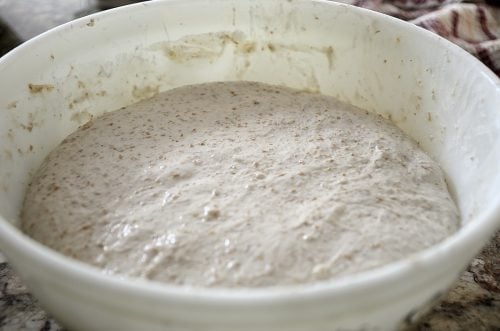
- Bulk Fermentation - This step takes about 4 hours and for the first 2 hours you are going to intervene every 30 minutes to stretch the dough. Start by storing your bowl of dough in a warm place- like an oven with a light on, a warming drawer. I heat my oven before the autolyse to 250 degrees and then turn it off. I put my dough loosely covered with a tea towel in the oven. After 30 minutes take the bowl out, wet your hands and scoop out the dough. Hold it on one edge and let the dough stretch downward from its own weight. Grasp it a quarter of the way around and repeat the stretch. You should have stretched it all the way around in 4 'directions' for at least 4 full rotations. As it gets thin and 'stringy' during the stretch bring the lower half of the dough up to join the upper half. Return the dough, covered, to the bowl and its rising location. Repeat the 'Stretch and Fold' 3 more times. You will see the texture of the dough change during your stretching exercises from very wet and gooey to more smooth and elastic. (My first loaf I didn't work the dough as much as I should have. This step helps develop the gluten and gives you a stronger dough/rise) During the last 2 hours of the bulk ferment you will leave the dough undisturbed. By the end the dough should have risen by about 50% and will look smooth on the top.
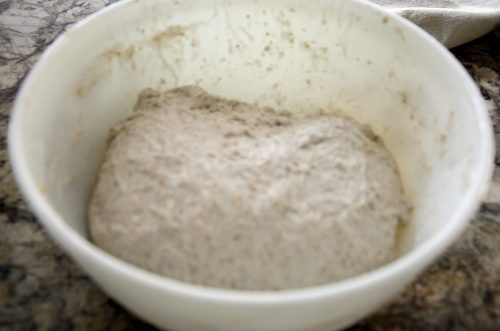
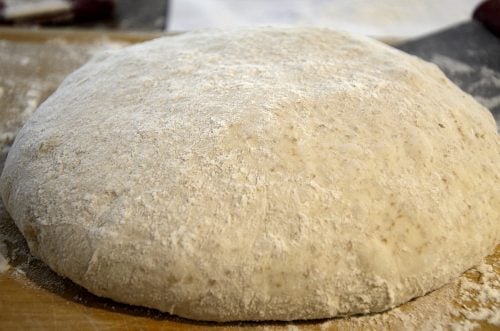
- Pre-Shape- next you are going to lightly flour your work surface, wet your hands and turn the dough out onto your work surface. Pinch an edge and draw the dough up and in to the center. Repeat this in 4 or 5 places around the outer edge of you dough ball. Do this a couple of times around. You want to end up with a nice round ball of dough. Lightly flour the top of the dough and let it rest 20-30 minutes.
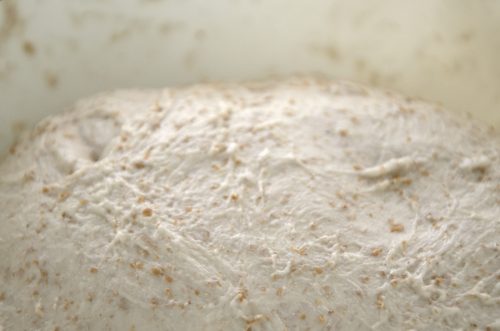
- Final Shaping - Turn the dough ball on to its top. Use flour on your work surface as necessary to keep the dough from sticking. You are going to pinch the dough on each of it's 4 'corners', stretch the dough and fold it into the center. Repeat around the ball. You should notice the skin be getting rounder and tighter and smoother.
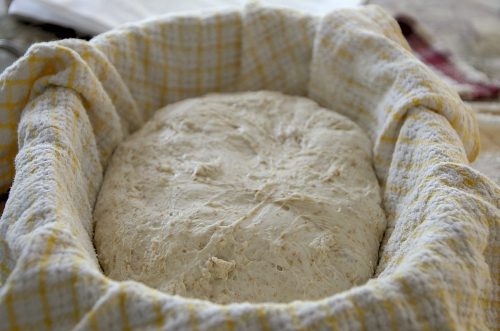
- Proofing- Take a clean tea towel and dust it heavily with flour. You do not want the dough to stick to the tea towel. Place the towel, flour side up in a medium bowl or proofing basket. Place the shaped dough, seam side up, in the tea towel. Loosely cover with the tea towel corners. Place bowl inside a plastic bag and seal. Place bowl in the fridge for at least 12 hours. 16 hours is even better and you can go up to 3 days with this refrigeration.
- Preheat- Place a dutch oven with its lid in a 515 degree oven and preheat about 45 minutes.
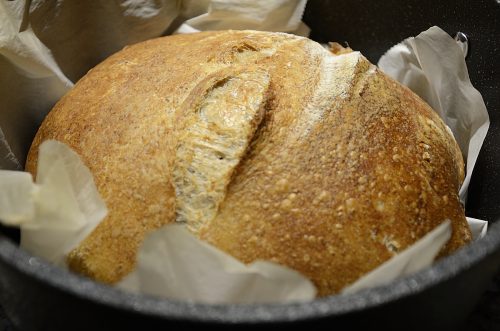
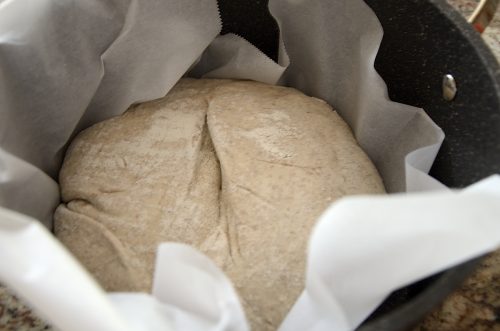
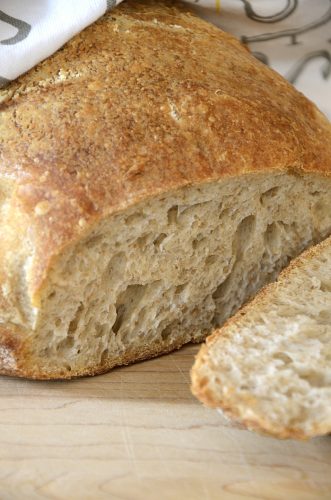
- Baking- Remove proofed loaf from the fridge. Turn the dough out onto a generous square of parchment paper. Take dutch oven out of the oven carefully. Carefully transfer the parchment paper with the loaf into the dutch oven. Score the top of the dough with a knife. Spritz generously with water. Reduce oven to 500 degrees and put a baking sheet with about a 1" lip upside down on the rack. Center the Dutch oven on the sheet and bake covered for about 24 minutes. (This is what makes the bottom crust crips but no so tough you can't cut it.) Reduce oven to 450 degrees, remove lid and bake another 20-24 minutes or so. Internal temperature of the loaf should read 208 degrees.
Process in Pictures

Mature Starter 
Starter floating on water indicates it is ready to use. Your Autolyze dough will be shaggy. Step 3- Autolyze after resting an hour Step 4- Mixing the autolyze and starter will give you a very wet dough. Step 5-Beginning of Bulk Fermentation Step 5- Stretch and Fold Step 5- Stretch and Fold Step 5- Stretch and Fold Step 5- Stretch and fold Step 5- Notice how the dough has gotten smoother and more elastic. Step 7-Final Shaping Step 8- Beginning of Proofing 
Step 8- End of Proofing Step 10- Transfer dough to pre-heated Dutch oven. Score and spray. Baked Loaf 
Cut Loaf


Chef's Tips for Sourdough Bread Making
- I have learned to make the dough for 2 loaves at at time. The first few steps require you to be close to your kitchen for 6-8 hours. So it isn't much more work to make up 2 batches. Don't just double the amounts because the extra volume will behave differently- make 2 separate doughs and just put them both through all the steps at the same time. When you get to the Proofing step you can leave the second dough in the fridge for up to 3 days without adverse effects. Or you can bake both consecutively and freeze one.
- Use stainless steel utensils for easier cleanup. Starter dough and sourdough stick to wooden spoons mercilessly.
- I use a Swedish antibacterial dish cloth to clean up my dishes. The dough doesn't stick to the spongy material like it does to a cloth dishcloth. Much easier clean up!
- If you are serious about bread making- weigh your ingredients. The amount of flour you need is about 4 ¼ cups but depending on how tightly packed the flour is the measured amount can be off by ½ a cup or more. (Ex. packed flour in the bag and measuring cup may only take 4 cups to get to 490 grams and loose flour might take 4 ½ cups or even a bit more. If using measurements you will have to adjust based on characteristics of your dough. This can be tricky because sourdough is very wet and sticky in the beginning.
- Work your way backward time-wise from the proofing time for when you want to start your process. I have had to wait up late at night to finish the Bulk fermentation, Pre-shape and Shape because my starter took longer to develop than I expected. Now I feed my starter the day before I plan to make sourdough and leave it on the counter so it is ready to go first thing in the morning.
- Do not skip the step of testing your starter to see if it floats. If the starter is not ready your whole exercise will be a fail. There just isn't any coming back from a weak starter that isn't up to the job!
- Work your dough more rather than less during the first 2 hours of the bulk fermentation. This step replaces the traditional kneading so to speak. This is where your gluten strengthens in order to give you a good rise and 'spring' during the baking process. I t also helps to avoid those undesirable big hollow holes (known as tunnels).
- Spritzing your loaf with water in the dutch oven just before baking helps to give you a thinner top crust and better rise because the moisture creates more steam and allows the bread to rise more before the crust stiffens.
- Remember to feed your starter weekly. I found that the 'tanginess' of my bread increased/improved after the first couple of times baking.
Don't Really Discard That Excess Starter!
I think I like the discard sourdough recipes as much (maybe even more) than the actual bread! Check out some of the delicious ways you can use the excess starter instead of throwing it out! Recipes For Sourdough Starter
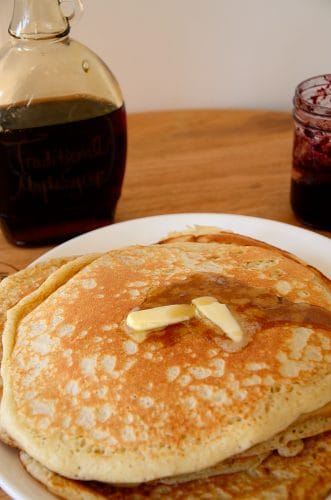
Sourdough Pancakes 
Sourdough Crackers 
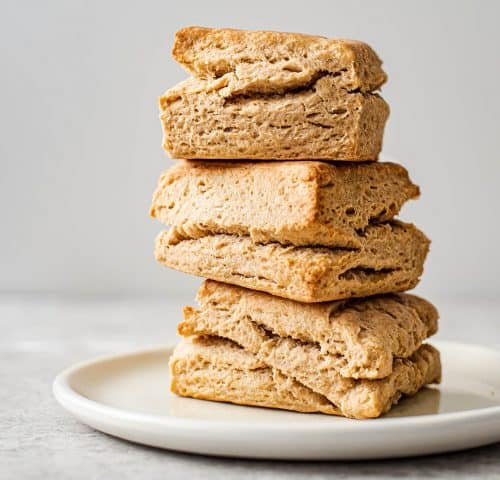
Sourdough Biscuits


Sourdough Bread
If you tried this, or any other recipe on my website, please leave a 🌟 star rating and let me know it went in the 📝 comments below!
Save Print Pin FacebookIngredients
- 100 grams mature starter (feed about ¼ cup and let double)
- 490 grams unbleached all purpose flour can use up to 200 grams whole wheat and remainder all purpose (490 grams flour is about 4 ¼ cups)
- 378 grams water divided 368 grams + 10 grams (about 1 ½ cups + 2 tsps)
- 10 grams fine sea salt about 1 ½ tsps
Instructions
- Feed your starter. Discard all but about ¼ cup and add 3 Tbsps flour and 2 ½ Tbsps water. Let it sit at room temperature until it has doubled in size and passes the float test. This can take anywhere from 1-8 hours depending on the heat and strength of your starter. You can start this the night before you plan to bake and leave at room temperature overnight. Feed it twice about 8 hours apart. Float test- drop a tablespoon of starter in a cup of water. Starter should float.
- Autolyse step. - You are going to need to be available to tend to the dough periodically for about 6 hours or so from this point. Mix all 490 grams (4 ¼ cups) of the flour with 368 grams (1 ⅔ cups) of water. Reserve the other 10 grams (2 tsps) for later. It will be a very shaggy dough. Cover and let sit in a warm place for 1 -1 ½ hours. If you fed your starter just before this try to time it so the starter will be mature at the same time as your autolyse will be done.
- Combine the starter, salt and dough. The remaining 10 grams (2 tsps) of water should be slightly warmer than room temperature. Add the mature starter, 10 grams (2 tsps) water into the autolyse dough. It will be very wet and sticky. Work the mixture with your hands to thoroughly mix it all together.
- Bulk Fermentation - This step takes about 4 hours and for the first 2 hours you are going to intervene every 30 minutes to stretch the dough. Start by storing your bowl of dough in a warm place- like an oven with a light on or a warming drawer. I heat my oven before the autolyse to 250 degrees and then turn it off. I put my dough loosely covered with a tea towel in the oven. After 30 minutes take the bowl out, wet your hands and scoop out the dough. Hold it on one edge and let the dough stretch downward from its own weight. Grasp it a quarter of the way around and repeat the stretch. You should have stretched it all the way around in 4 'directions'. As it gets thin and 'stringy' during the stretch bring the lower half of the dough up to join the upper half. Return the dough, covered, to the bowl and its rising location. Repeat the 'Stretch and Fold' 3 more times. You will see the texture of the dough change during your stretching exercises from very wet and gooey to more smooth and elastic. (My first loaf I didn't work the dough as much as I should have. This step helps develop the gluten and gives you a stronger dough/rise). During the last 2 hours of the bulk ferment you will leave the dough undisturbed. By the end the dough should have risen by about 50% and will look smooth on the top.
- Pre-Shape- next you are going to lightly flour your work surface, wet your hands and turn the dough out onto your work surface. Pinch an edge and draw the dough in to the center. Repeat this in 4 or 5 places around the outer edge of you dough ball. Do this a couple of times around. You want to end up with a nice round ball of dough. Lightly flour the top of the dough and let it rest 20-30 minutes.
- Final Shaping - Turn the dough ball on to its top. Use flour on your work surface as necessary to keep the dough from sticking. You are going to pinch the dough on each of it's 4 'corners', stretch the dough up and fold it into the center. Repeat around the ball. You should notice the skin be getting rounder and tighter and smoother.
- Proofing- Take a clean tea towel and dust it heavily with flour. You do not want the dough to stick to the tea towel. Place the towel, flour side up in a medium bowl or proofing basket. Place the shaped dough, seam side up, in the tea towel. Loosely cover with the tea towel corners. Place bowl inside a plastic bag and seal. Place bowl in the fridge for at least 12 hours. 16 hours is even better and you can go up to 3 days with this refrigeration.
- Preheat- Place a dutch oven with its lid in a 515 degree oven and preheat about 45 minutes.
- Baking- Remove proofed loaf from the fridge. Turn the dough out onto a generous square of parchment paper. Take dutch oven out of the oven carefully. Carefully transfer the parchment paper with the loaf into the dutch oven. Score the top of the dough with a knife. Spritz generously with water. Reduce the oven temp to 500 degrees. Place a baking pan with about a 1" edge upside down on the rack. Center the Dutch oven on the sheet and bake covered for about 24 minutes. Reduce oven to 450 degrees, remove lid and bake another 20-25 minutes or so. Internal temperature of the loaf should read 208 degrees.
- Allow bread to cool completely on a wire rack.

Leave a Reply