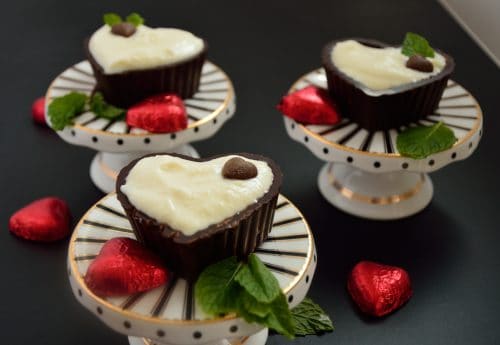
.These chocolate dessert shells are actually way easier to make than I had imagined! I have seen empty chocolate 'bowls' in stores but - I can never find them when I need them and now that I know how to make them it is easier than going to the store!
For 6 dessert shells you will need:
- 2- 4oz dark chocolate bars, preferably 70% cacao or higher
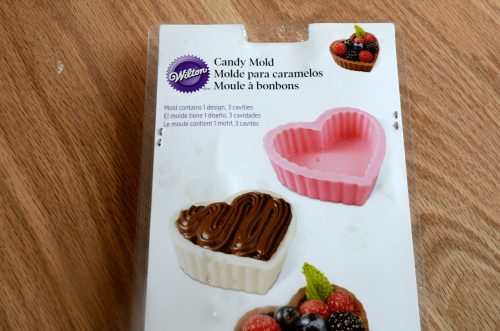
- a candy mold. I got mine at Bulk Barn for just a couple of dollars. They come in all kinds of fun shapes and sizes - bowls, hearts, flowers etc. You can re-use them and they are light and slim so they don't take up much storage space.
My new favorite way to melt chocolate is to break the bar into pieces. Put the chunks in a heat proof bowl and set the bowl in a saucepan of water on the stove. Bring the water to a boil and stir the chocolate until it is evenly melted. This way is faster than a double boiler and doesn't have the same risk of burning the chocolate in the microwave.
I also found the I could leave the bowl in the warm water in the sauce pan as I was working with the molds and there was no risk of it hardening.
Here is a little tip. When you open the mold forms, mine had 2 clear stretchy bands around the forms. I almost cut them off until I realized they stretched. Keep them because you use them as security to keep the molds together after you have filled them and they are in the fridge.
Once the chocolate is melted you spoon it into the bottom, larger side of the mold until it is about ⅓ filled. My 4" mold took about 1 ½ -2 Tbsps of melted chocolate. Don't over-fill the molds or you may have excess that spills out over the top of the mold.
Then gently press the top/inside mold over the bottom form. Press the 2 sides of the mold together evenly. Turn it upside down and tap gently to allow the melted chocolate to fill the mold space and remove all bubbles. I had 1 out of 6 molds that showed a bit of 'bubble damage'. Next time I will tap them all twice! Put those stretchy bands around the 2 mold forms to ensure they don't come apart.
Then you stick them in the fridge to harden. That takes about 15-20 minutes. But they can stay in the fridge however long, until you need them. When you are ready to unmold, stick them in the freezer for a couple of minutes.
Unmolding
I was a bit worried whether I would get a clean edge on the shell. As it turns out it is very easy. Gently separate the forms. The chocolate shell will be stuck to the inside, smaller mold. With the mold flat on the counter, take a sharp knife with a fine tip and run the tip around the outside of the form. Any excess chocolate that has spread out beyond the edge of the 'bowl' will separate very easily leaving you with a clean edge on your shell.
Now turn the mold over and run a bit of LUKEWARM water into the cavity of the form. Dump the water out immediately. When you turn the mold over the shells will slip right off. Just be careful in this step not to use too hot water or you will melt the chocolate again.
I returned my 'now-free-standing' shells to the fridge on a plate to make sure they didn't get too soft while I was unmolding the others and getting my filling ready.
You can fill them when you are ready with anything you like- my Gran Marnier Panna Cotta is awesome! Fresh fruit with a drizzle of cream or liqueur, any mousse or pudding would work too!
Enjoy!

Leave a Reply